Develop an App with Salesforce CLI and Source Control
This is one of the best Project by Trailhead . There is a exhaustive lot you do but every minute you spend on this is worth a dime.
You create a Git Repository , a master branch, two feature branches and then merge them to master and finally deploy this master to a Trailhead playground. While you do this, you also create couple of scratch orgs to modify files. You will really see how everything connects. Go for it mate….experience the SFDX.
While deploying to one of the org, you will face an issue with admin profile. Just delete the admin profile from source code & move on…
- Git as a version control system and GitHub as a hosted repository
- Authorize a DevHub -> sfdx force:auth:web:login –setdefaultdevhubusername –setalias DevHub
- Use this Dev Hub as the default for all Salesforce DX projects on this computer so that you don’t have to specify again. sfdx force:config:set defaultdevhubusername=DevHub –global
- Use the Salesforce CLI to create a skeleton project structure named sfdx-chan -> sfdx force:project:create –projectname crmsmith
- Scratch org definition files allow you to easily create scratch orgs with different features or preferences for testing. ->sfdx-chan/config/project-scratch-def.json
- When syncing metadata between your local file system and a scratch org, or the other way around, you might have source files or metadata that you want to exclude. Sometimes, you make a change directly in a scratch org but you don’t want to pull that change into your local DX project. Sometimes, you have files in your local DX project that you don’t want to deploy – or can’t deploy – to your scratch org.In these situations, create a file named .forceignore to specify the files or directories you want to exclude.
- Retrieve Existing Metadata mkdir assets & In yourcrmsmith/assets folder, create a file named package.xml and save the below manifest contents into the file. This is the key, package.xml is the foundation of what files you want as part of your source code. I need to find an easy way to build package.xml
- In your CRMSMITH working directory, retrieve the DreamHouse app’s metadata sfdx force:source:retrieve –manifest assets/package.xml –targetusername DevHub –wait 10
- Export Sample Data -> sfdx force:data:tree:export –targetusername DevHub –outputdir assets/data –query “SELECT Id, Name, Email__c, Phone__c, Mobile_Phone__c, Title__c, Picture__c, ( SELECT Id, Address__c, Assessed_Value__c, Baths__c, Beds__c, Broker__c, City__c, Date_Agreement__c, Date_Closed__c, Date_Contracted__c, Date_Listed__c, Date_Pre_Market__c, Description__c, Location__Longitude__s, Location__Latitude__s, Picture__c, Price__c, Name, State__c, Status__c, Tags__c, Thumbnail__c, Title__c, Zip__c FROM Properties__r ) FROM Broker__c”
Creating a GitHub Repository
- Create a GitHub repository at https://github.com/new.
- Set your name to associate as the author of future Git commits. This should be your first and/or last name. git config –global user.name “Your Name”
- Set your email address to associate as the author of future Git commits. This should be the email address you use with GitHub. git config –global user.email “you@email.com”
- In your sfdx-chan working directory, initialize a local Git repository git init
- Add all files in the project to be tracked by Git git add .
- Commit the added files as a snapshot to the project’s version history. git commit –message “Initial commit of DreamHouse metadata”
- Link your local Git repository with your remote GitHub repository. Make sure to replace
YOUR_GITHUB_USERNAMEwith your actual GitHub username. git remote add origin https://github.com/YOUR_GITHUB_USERNAME/sfdx-project.git - Push local commits (your file revisions) to the master branch on GitHub.git push origin master
Feature Branching
- Branches allow developers to work on their own features without affecting the main codeline and to be isolated from changes going on elsewhere.
- In your sfdx-chan working directory, switch to a new Git branch named feature-chan-map > git checkout -b feature-chan-map
- Make some changes in both source code & org and do a git pull
- Add all modified files in the project to be tracked by Git (any files listed in
.gitignorefile will be ignored) – git add . - Commit the added files as a snapshot to the project’s version history –git commit –message “Added map component to property page”
- Push the local feature branch to GitHub git push -u origin feature-chan-map
- Clone the master branch : git clone https://github.com/YOUR_GITHUB_USERNAME/sfdx-project.git sfdx-maria
- Switch to a new feature-maria-gallery git checkout -b feature-maria-gallery
- Modify files and then got add . + git commit –message “Added gallery component to property page” + git push -u origin feature-maria-gallery
Merge Feature Branches and Deploy Metadata- git checkout master
- git pull origin master
- sfdx force:source:deploy –targetusername DevHub –sourcepath force-app
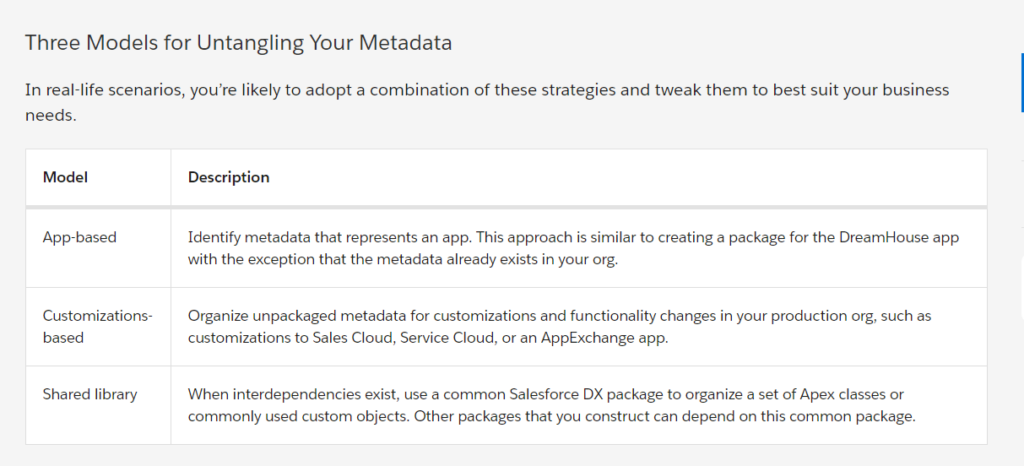
Three Models of Untangling Metadata!

Basics of working with unmanaged package – Big Picture!
Think of a package as a stand-alone application, or a collection of metadata items that you can release on its own without having to release all packages. Packaging metadata makes your deployment process succinct and easier to manage. Packages are organized in a variety of ways, such as by app, by shared library, or by feature. However you organize your metadata packages, it’s important to have the sfdx-project.json file set up correctly so you can create and release new versions of your package.
- from VS Code , i opened “Documents” Folder
- I then opened Terminal and using below command cloned a project from github
- git clone https://github.com/developerforce/PermSetUnlockedPackage.git
- Authorized a Devhub : sfdx force:auth:web:login -d -a DevHub
- Created a scratch Org: sfdx force:org:create -f config/project-scratch-def.json -s
- Scratch orgs are defined by the project-scratch-def.json file, which resides in a project’s config directory.
- You don’t need a password because Salesforce DX stores a cached authentication token on your machine for the new scratch org.
- Created unlocked managed package
- sfdx force:package:create –name salesApps –description “My Package” –packagetype Unlocked –path force-app –nonamespace –targetdevhubusername DevHu
- Pushed metadata into sfdx force:source:push
- Created permission set manually in scratch org
- I pulled the permission set from Org to local source code sfdx force:source:pull
- I then upgraded the package manually in VSCODE. Go to sfdx-project.json and update VersionName & VersionNumber
- Created a New Version of the package
- sfdx force:package:version:create -p salesApps -d force-app -k test1234 –wait 10 -v DevHub
- To promote Package version -> sfdx force:package:version:promote -p salesApps@1.0.0-1 -v DevHub
- install the unmanaged package in DevHub (or Production)
- sfdx force:package:install –wait 10 –publishwait 10 –package salesApps@1.0.0-1 -k test1234 -r -u DevHub
- Source: https://trailhead.salesforce.com/content/learn/projects/perm-set-unlocked?trail_id=sfdx_get_started
sfdx force:source:push ; sfdx force:source:pull

- Opened my already created scratch Org
- Created Apex Class
- Created Multiple Aura Components
- Pushed the source code to scratch org: sfdx force:source:push
- Created Tab & Permission Set manually in scratch org
- Pulled the metadata of newly created Tab & Perm set to scratch org: sfdx force:source:pull
- Created another org to test
- Pushed the overall code to new Org using CLI
- Assigned permission set using cli
- Loaded data using cli
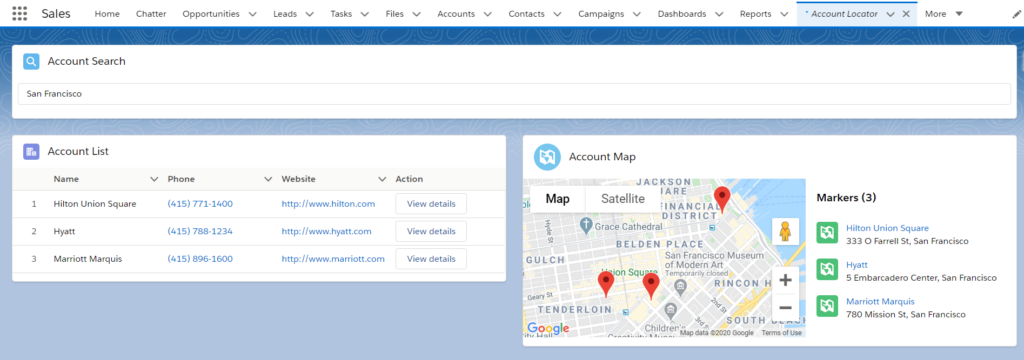
- Final Output is above…Satisfying!
- Source: https://trailhead.salesforce.com/content/learn/modules/sfdx_app_dev/sfdx_app_dev_build_app
- Source: https://trailhead.salesforce.com/content/learn/modules/sfdx_app_dev/sfdx_app_dev_create_visuals
Managing Scratch Orgs…
- To authorize a DevHub (i used mydeveloper sandbox)
- sfdx force:auth:web:login -d -a DevHub
- Adding the -d flag sets this org as the default Dev Hub. Use the -a to set an alias for the org (something catchy like DevHub). An alias is much easier to remember than the unique Dev Hub username.
- Only indicate the -d flag for your Dev Hub. If you use it with a different org, you can’t create scratch orgs until you correctly identify the Dev Hub using the config:set command.
- if you want to open the Dev Hub org to look at active scratch orgs or your namespace registry, the alias comes in quite handy:
- sfdx force:org:open -u DevHub
- It’s likely you have many orgs, including sandboxes and your production org. With the CLI, you can also log in to them using these commands. When you log in to an org using the CLI, you add that org to the list of orgs that the CLI can work with in the future.
- sfdx force:auth:web:login -r https://test.salesforce.com -a FullSandbox
- Aliasing is powerful as it is difficult to remember complex usernames especially for scratch org.
- View all orgs : sfdx force:org:list
‘npm’ is not recognized as an internal or external command

$ sfdx force:project:create -n geolocation
ERROR running force:project:create:  Command failed with exit code 1: npm root -g --prefix C:\Users\XXXX\documents\SFDX\my_sfdx_project\.yo-repository --loglevel error
'npm' is not recognized as an internal or external command,
operable program or batch file.
if you get above error. Just install https://nodejs.org/en/download/
Creating my First Scratch Org….
- Trailhead!!
- Downloaded the “git for Windows”
- Created my unique directory to do my work
- cloned the Dreamhouse app repository from git
- navigated to Master Branch
- checkedout my own branch
- created my first scratch org
- Pushed local source code into the scratch org
- Assigned Permission Set
- Imported Data
- Everything via CLI…Wohoo!
- Source: https://trailhead.salesforce.com/content/learn/projects/quick-start-salesforce-dx?trail_id=sfdx_get_started

sfdx force:org:create -s -f config/project-scratch-def.json -a dreamforce-org
Pushed my local source code to scratch org

Assigned Permission Set
sfdx force:user:permset:assign -n Dreamhouse
Imported Test Data
sfdx force:data:tree:import --plan data/sample-data-plan.json
sfdx force:org:open
Build Apps Together with Package Development
- A famous thespian, or perhaps it was a Salesforce visionary, once said, “All the world’s an org.”
- In the org-based model, your production org is the source of truth for all your code, configuration, and customization.
- Even if you have multiple teams working on separate development projects, they develop and release their updates with the same deployment. Everything goes into one package.xml.
- Package Development : Instead of building code and customizations for the org, you create a package (a logical set of code). A package is a release artifact that is a group of related code and customizations.
- With this new process, you’re able to organize your org into a set of packages.
- You store all source for your packages in a source control repository, where the source of truth is maintained.
- You build scratch (development) orgs from that source, so you can work specifically on your package.
- Package development gives you more flexibility in managing your teams and releases. You can assign teams to own a particular package. Development teams can develop separately and build toward a release of the package, and not a release of updates to the org. With this agile model, you can have more frequent, independent releases, as you can see in the development, build, and deploy flow.
- For our enterprise customers, we have a special package type, called unlocked packages (GA), which are especially suited for internal business apps.
- Source : https://trailhead.salesforce.com/en/content/learn/modules/sfdx_dev_model/sfdx_dev_model_neworganization?trail_id=sfdx_get_started
Tools which helps in Package Development Model
- Salesforce CLI –> You can script everything from the creation of orgs to the import and export of data–everything required to manage the full development life cycle.
- Developers can use it to manage their DX projects, create scratch orgs, push and pull metadata to and from a scratch org, and run unit tests.
- DevOps can use it as part of build automation scripts: to create and access environments, to deploy source, to install packages, and to run tests.
- Salesforce Extensions for VS Code
- Scratch Orgs -> And you can share the scratch org configuration file with other team members.
- Scratch orgs don’t have the capacity to contain the entire happy soup of metadata contained in your production org. Also, they weren’t meant to replace sandboxes either.
- Align source development use cases to your scratch orgs, and align release and deployment testing to your sandboxes.
- Scratch Org is a dedicated and disposable salesforce environment for a developer and their project
- Source : https://trailhead.salesforce.com/content/learn/modules/sfdx_dev_model?trail_id=sfdx_get_started
Source – Driven Development
- The Salesforce DX project reflects this package-based approach to organizing your source.
- A Salesforce DX project is a local directory structure of your metadata in source format. It lets you develop and test with Salesforce DX tooling.
- It contains configuration files for creating scratch orgs. It can contain data to be loaded into orgs for development or testing. It also contains tests that you rely on to validate your package.
- At a minimum, the project manages the source for one package. That being said, if multiple packages get built and released together, you can organize these packages into a single DX project. Each of your packages aligns to a package directory defined in the project configuration file.
- After you create a scratch org, you still have some setup tasks to complete. You push all source from the project to the scratch org, set up permissions, and create or load any test data that your package requires.
- While the IDE or text editor is available for programmatic (code-based) development, you can use the scratch org for declarative (point-and-click) development. This process is similar to what you do in your sandbox or production org. What’s different in the source-driven model is that you synchronize any development you did in the scratch org with your local project. This synchronization lets you commit changes made in the Setup pages alongside changes made in your local IDE.
- A key feature of Salesforce DX is that you can easily keep your project and scratch org in sync. So you can put away those sticky notes! You no longer have to jot down what you changed in your local file system, IDE, or editor, or what you changed in your org.
- Salesforce DX tracks any change you make locally in the project and any changes you have made in your scratch org.
- Before you push source changes to the scratch org, or pull changes to your local project, you can view a list changes you’ve made. That’s the power of the Salesforce CLI in action.
- DX project format breaks down large source files to make them more digestible and easier to manage with a version control system. For example, Salesforce DX transforms custom objects and custom object translations into multiple files and directories. This source structure makes it much easier to find what you want to change or update. Smaller files in source control mean fewer merge conflicts during team development. Say bye-bye to messy merges!
- Source : https://trailhead.salesforce.com/content/learn/modules/sfdx_dev_model/sfdx_dev_model_sdd?trail_id=sfdx_get_started
Start
- At the start of a project, you can retrieve metadata source from an org and convert it to source format, then store it in a VCS. Once you’ve created and tested your app or customizations, you’re ready to create the deployment artifact. You can convert from source format back to metadata format, and then all your source is ready to deploy to a scratch org. You can deploy all the source, and the deploy operation takes care of updating the files that have changed. You can omit certain files from the deployment, and construct exactly what to deploy by modifying the package.xml file created during the convert process.
Scratch Orgs
- Setup -> DevHub -> Enable
- install CLI
- enter SFDX into CLI
- to authenticate an Devhub org: sfdx force:auth:web:login -d -a DevHub
- Adding the -d flag sets this org as the default Dev Hub. Use the -a to set an alias for the org (something catchy like DevHub). An alias is much easier to remember than the unique Dev Hub username.
- sfdx force –help
- sfdx force:doc:command:list
- sfdx force:org:list
- sfdx force:org:open -u DeHub